apt install fuse3创建挂载目录
mkdir /home/gd2/gd添加挂载守护进程
cat > /etc/systemd/system/gd.service <<EOF
[Unit]
Description=Rclone
AssertPathIsDirectory=/home/gd2/gd
After=network-online.target
[Service]
Type=notify
ExecStart=/usr/bin/rclone mount gd1: /home/gd2/gd \
--use-mmap \
--umask 000 \
--default-permissions \
--no-check-certificate --allow-other \
--allow-non-empty \
--dir-cache-time 24h \
--cache-dir=/home/cache \
--vfs-cache-mode full \
--vfs-write-back 5s \
--buffer-size 256M \
--vfs-read-ahead 512M \
--vfs-read-chunk-size 32M \
--vfs-read-chunk-size-limit 128M \
--vfs-cache-max-size 100G \
--vfs-cache-min-free-space 30G \
--low-level-retries 200 \
--config /root/.config/rclone/rclone.conf
ExecStop=/bin/fusermount -qzu /home/gd2/gd
Restart=on-abort
User=root
[Install]
WantedBy=default.target

EOF
启动服务
systemctl enable --now gd && systemctl status gd元数据和图片放在网盘上 加载速度会比放在本地慢一些 所以我们可以使用OverlayFS 实现图片和元数据文件储存到本地
OverlayFS 是 Linux 的一个文件系统,用途很广泛,比如 openwrt、docker 的文件系统就基于这个。简单讲一下他的作用。
OverlayFS 可以多个目录进行合并成一个新的目录,比如a、b两个目录里分别有 1.mp4 和 1.nfo 文件,那么他们合并成的新目录就同时包含了1.mp4和1.nfo两个文件。另外 OverlayFS 也有层级的概念,如果a、b目录有同名的文件,那么更高层级的目录的文件会优先被访问。

引用自rclone挂载Google群友盘 + OverlayFS + tmm + kodi打造家庭媒体中心
创建必要目录
根据自己实际情况更改
mkdir /home/gd-upper /home/gd-work /home/gd- upper:作为上层目录,对谷歌云的读写都会保存到这里,而不会真正写入谷歌云的挂载点
- work: 存储临时文件
- gd: 合并出的新目录
*
挂载 OverlayFS
mount -t overlay overlay -o lowerdir=/home/gd2/gd,upperdir=/home/gd-upper,workdir=/home/gd-work /home/gd- lowerdir=/home/gd:代表底层目录,写操作不会实际写到这里,读操作优先读取上层目录,读不到的才会读这里(比如视频文件)
- upperdir=/home/gd-upper:代表上层目录,读写优先对这里操作,会保存nfo、poster等文件
- workdir=/home/gd-work:临时目录,系统需要的,我们不用管他的作用
- /home/gd2:合并出的新目录,我们后续只对他进行访问
*
复制元数据/图片到本地
cat > emby.txt <<EOF
+ *.jpg
+ *.png
+ *.nfo
- *
EOF
假设EMBY文件放在Google Drive根目录的EMBY目录上
rclone copy -P gd:EMBY /home/gd-upper/EMBY --filter-from emby.txt --transfers=100文件去重
rclone dedupe -P name: --dedupe-mode largest20250126更新
最近发现使用OverlayFS在处理大文件的时候 经常会导致某些目录无法访问 遂改用MergerFS替代
mergerfs -o cache.files=off,dropcacheonclose=false,category.create=mfs /home/gd2/gd=RO:/home/gd2/gd-upper=RW /home/gdsystemd守护进程
[Unit]
Description=mergerfs /home/gd service
After=local-fs.target network.target

[Service]
Type=simple
KillMode=none
ExecStartPre=/bin/sleep 15
ExecStart=/usr/bin/mergerfs \
  -f \
  -o cache.files=off \
  -o category.create=mfs \
  -o dropcacheonclose=false \
  /home/gd2/gd=RO:/home/gd2/gd-upper=RW \
  /home/gd
#ExecStartPost=/usr/bin/docker start nas-tools emby
ExecStop=/bin/fusermount -uz /home/gd
Restart=on-failure

[Install]
WantedBy=default.target
NGINX反向代理
        #PROXY-START/

        client_max_body_size 5000M;
            proxy_set_header X-Real-IP $remote_addr;
            proxy_set_header X-Forwarded-For '$proxy_add_x_forwarded_for';
            proxy_set_header X-Forwarded-Proto $scheme;
            proxy_set_header Sec-WebSocket-Extensions $http_sec_websocket_extensions;
            proxy_set_header Sec-WebSocket-Key $http_sec_websocket_key;
            proxy_set_header Sec-WebSocket-Version $http_sec_websocket_version;
            proxy_cache off;
            proxy_redirect off;
            proxy_buffering off;
        location / {
                proxy_pass http://127.0.0.1:8096;
                proxy_set_header X-Forwarded-For $remote_addr;
                proxy_ssl_verify off;
                proxy_http_version 1.1;
                proxy_set_header Host $http_host;
                proxy_set_header Upgrade $http_upgrade;
                proxy_set_header Connection "upgrade";
                proxy_read_timeout 86400;
            }

        location ~* \.(gif|png|jpg|css|js|woff|woff2)$
        {
            proxy_pass http://127.0.0.1:8096;
            proxy_set_header Host $host;
            proxy_set_header X-Real-IP $remote_addr;
            proxy_set_header X-Forwarded-For $proxy_add_x_forwarded_for;
            proxy_set_header REMOTE-HOST $remote_addr;
            expires 12h;#图片缓存浏览器过期时间
        }

#PROXY-END/pacman -S caddyDebian安装
apt install -y debian-keyring debian-archive-keyring apt-transport-https
curl -1sLf 'https://dl.cloudsmith.io/public/caddy/stable/gpg.key' | gpg --dearmor -o /usr/share/keyrings/caddy-stable-archive-keyring.gpg
curl -1sLf 'https://dl.cloudsmith.io/public/caddy/stable/debian.deb.txt' |  tee /etc/apt/sources.list.d/caddy-stable.list
apt update
apt install caddy
添加 http.handlers.replace_response模块
caddy add-package github.com/caddyserver/replace-response检查http.handlers.replace_response模块是否安装完成
[root@archlinux ~]# caddy list-modules | grep http.handlers.replace_response
http.handlers.replace_response
Caddy目录
[root@archlinux caddy]# tree
.
├── Caddyfile
└── conf.d
修改默认 Caddyfile配置文件 注册 replace指令
nano /etc/caddy/Caddyfile{
order replace after encode
}添加网站配置
nano /etc/caddy/conf.d/example.comexample.com {
reverse_proxy https://example.com {
header_up Host {upstream_hostport}
header_up Accept-Encoding identity
}
replace aaa bbb
}重载caddy配置
systemctl reload caddy参考
https://caddyserver.com/docs/caddyfile/directives/reverse_proxy
https://github.com/caddyserver/replace-response
申请IP证书
ip {
  tls {
    issuer acme {
      profile shortlived
    }
  }

  # other config
  root * /usr/share/caddy
}wireguard等依赖Debian
apt update -y && apt install wireguard sudo curl vim openresolv -yArch Linux
yay -S wireguard-tools openresolv wgcf vim dnsutils linux-headers --needed安装wgcf
Debian
curl -fsSL git.io/wgcf.sh | sudo bash注册账户
wgcf register生成配置文件
wgcf generate编辑配置文件
vim wgcf-profile.conf配置文件样式
[Interface]
PrivateKey = 这里会自动生成
Address = 172.16.0.2/32
Address = 这里会自动生成
DNS = 8.8.8.8,8.8.4.4,2001:4860:4860::8888,2001:4860:4860::8844
MTU = 1280
[Peer]
PublicKey = bmXOC+F1FxEMF9dyiK2H5/1SUtzH0JuVo51h2wPfgyo=
AllowedIPs = 0.0.0.0/0
AllowedIPs = ::/0
Endpoint = engage.cloudflareclient.com:2408更改engage.cloudflareclient.com为IPV4/6地址(如双栈网络接入忽略)
[root@archlinux ~]# nslookup engage.cloudflareclient.com
Server:         1.1.1.1
Address:        1.1.1.1#53

Non-authoritative answer:
Name:   engage.cloudflareclient.com
Address: 162.159.192.1
Name:   engage.cloudflareclient.com
Address: 2606:4700:d0::a29f:c001
接入WARP IPV4
删除配置文件中的AllowedIPs = ::/0
接入WARP IPV6
删除配置文件中的AllowedIPs = 0.0.0.0/0
启动wireguard
复制配置文件到wireguard文件夹
cp wgcf-profile.conf /etc/wireguard/wgcf.conf启动 wireguard
wg-quick up wgcf检查网络连通
# IPv4 Only VPS
curl -6 ip.p3terx.com
# IPv6 Only VPS
curl -4 ip.p3terx.com
关闭wgcf接口
wg-quick down wgcf将wireguard启用守护进程
systemctl start wg-quick@wgcf
systemctl enable wg-quick@wgcf官方Github仓库

在安装配置好CLI的情况下,使用这个命令连接控制台
scw instance server console 实例id zone=区域然后将 VM 重新启动到 UEFI设置 (机器能正常启动的情况下)
systemctl reboot --firmware然后就会跳转到这个界面
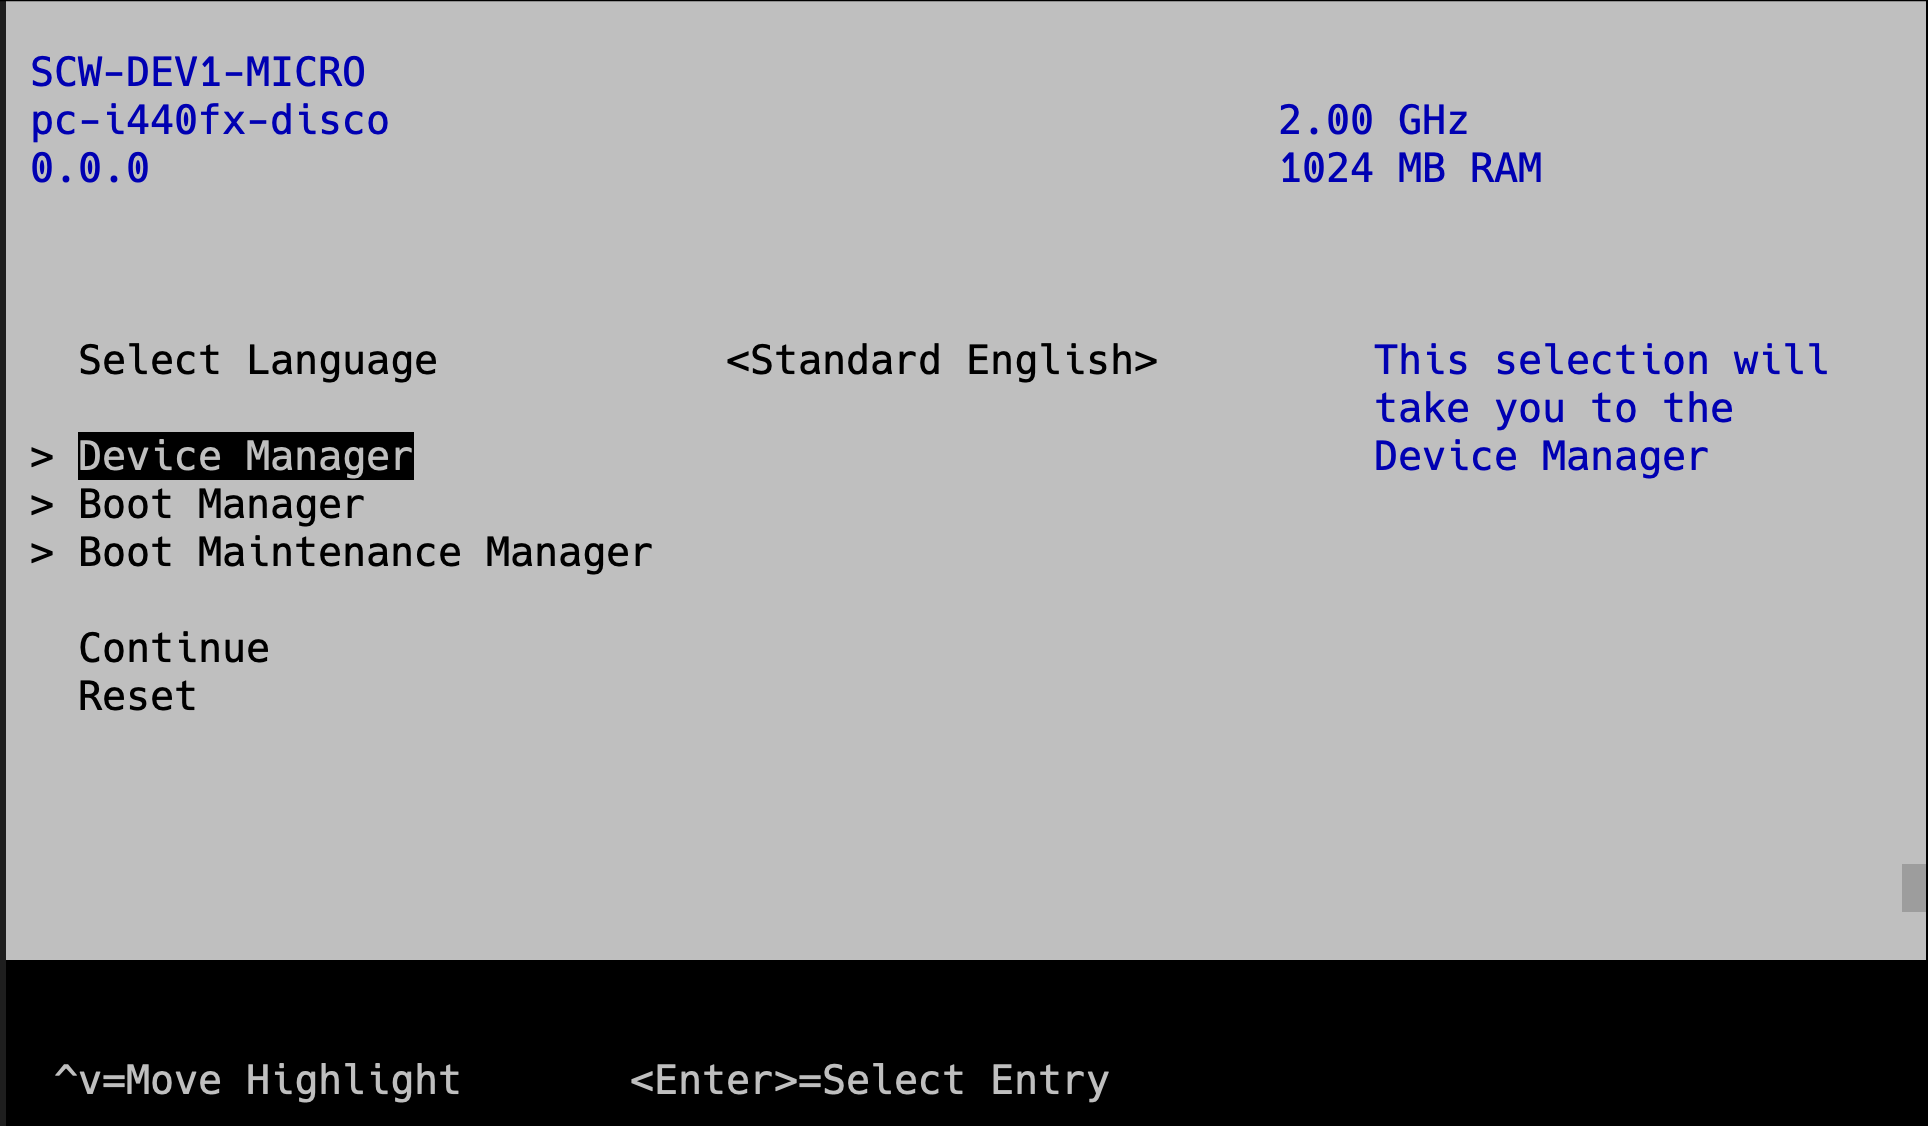
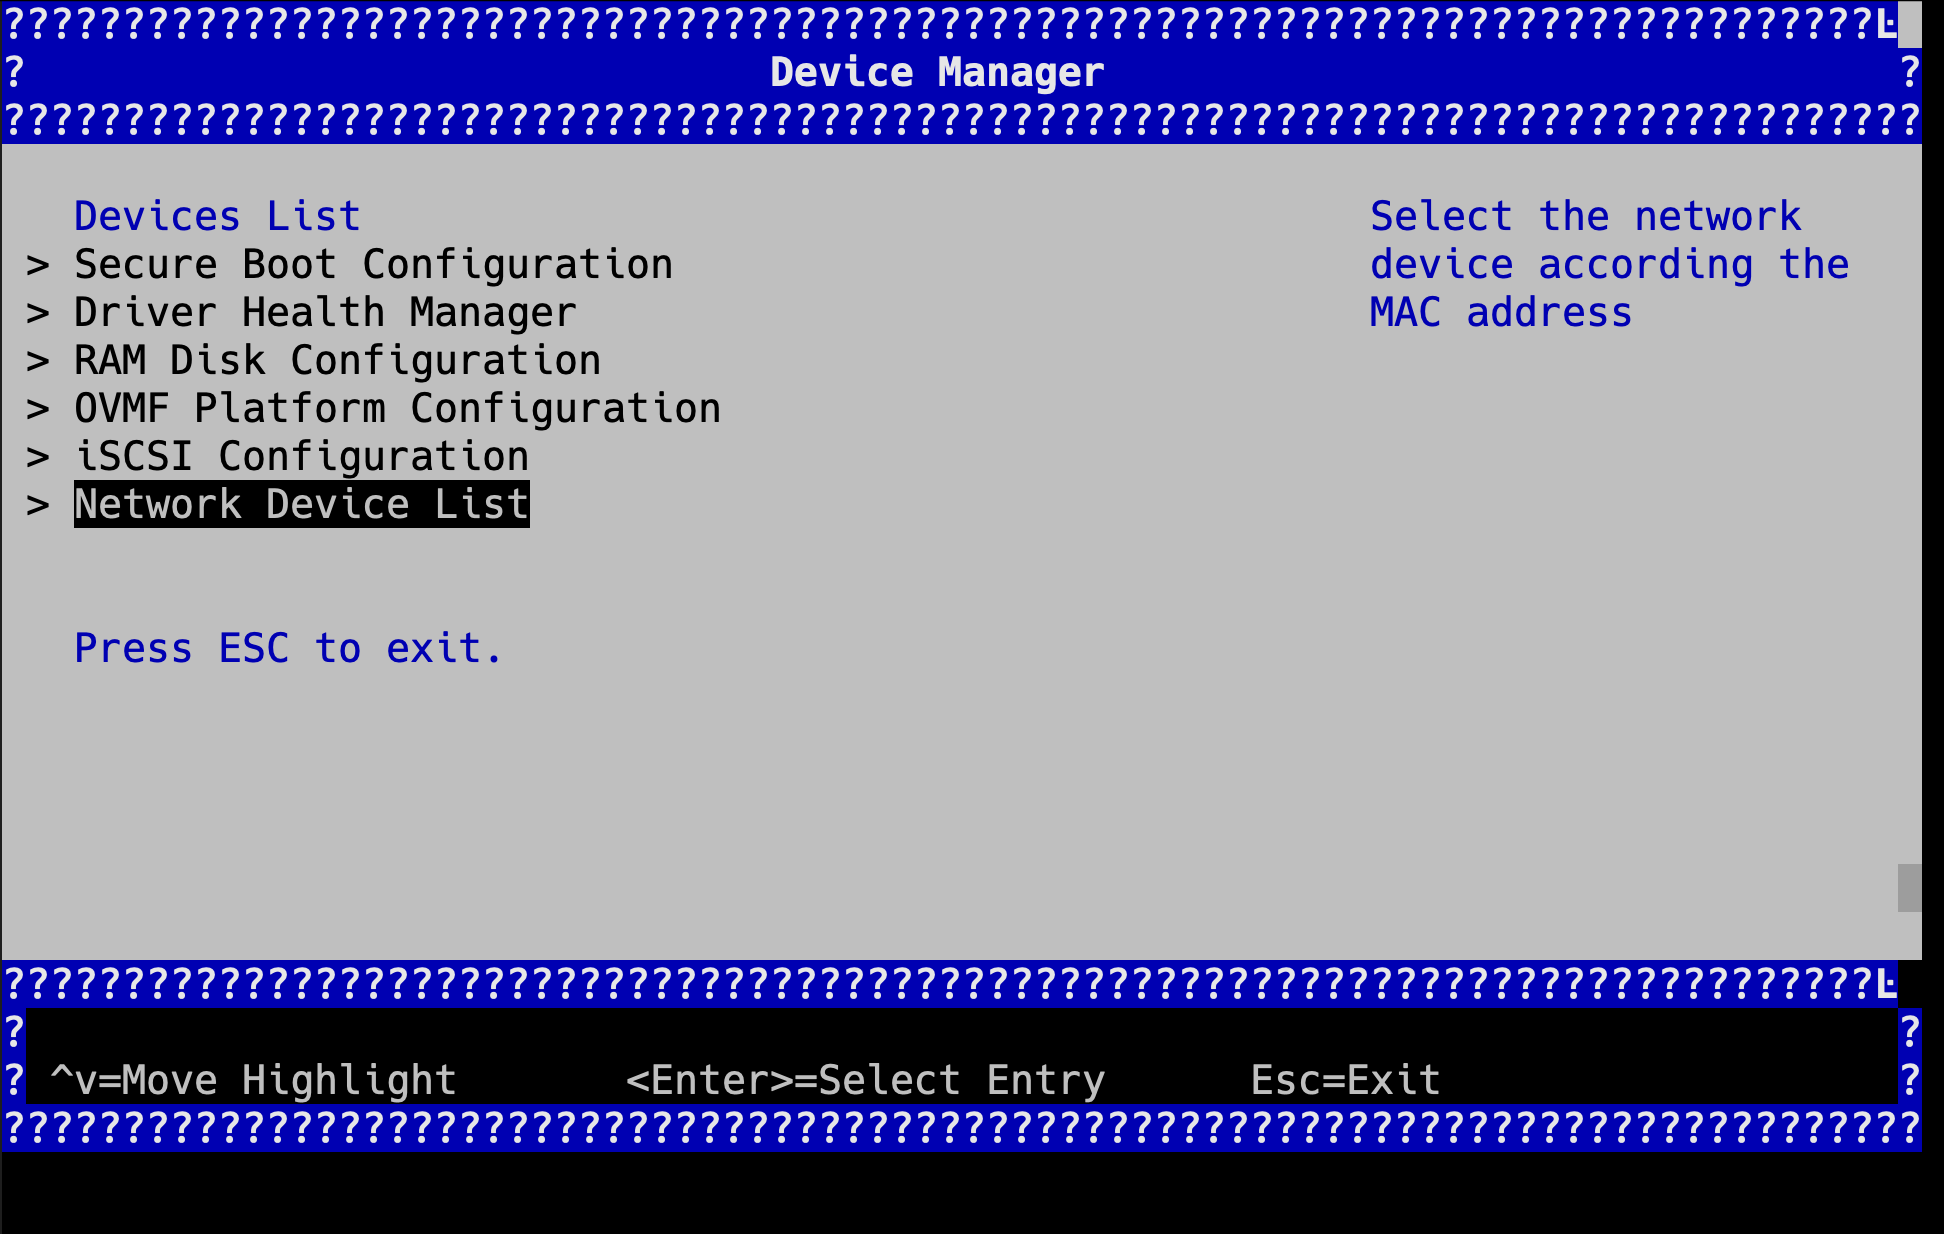
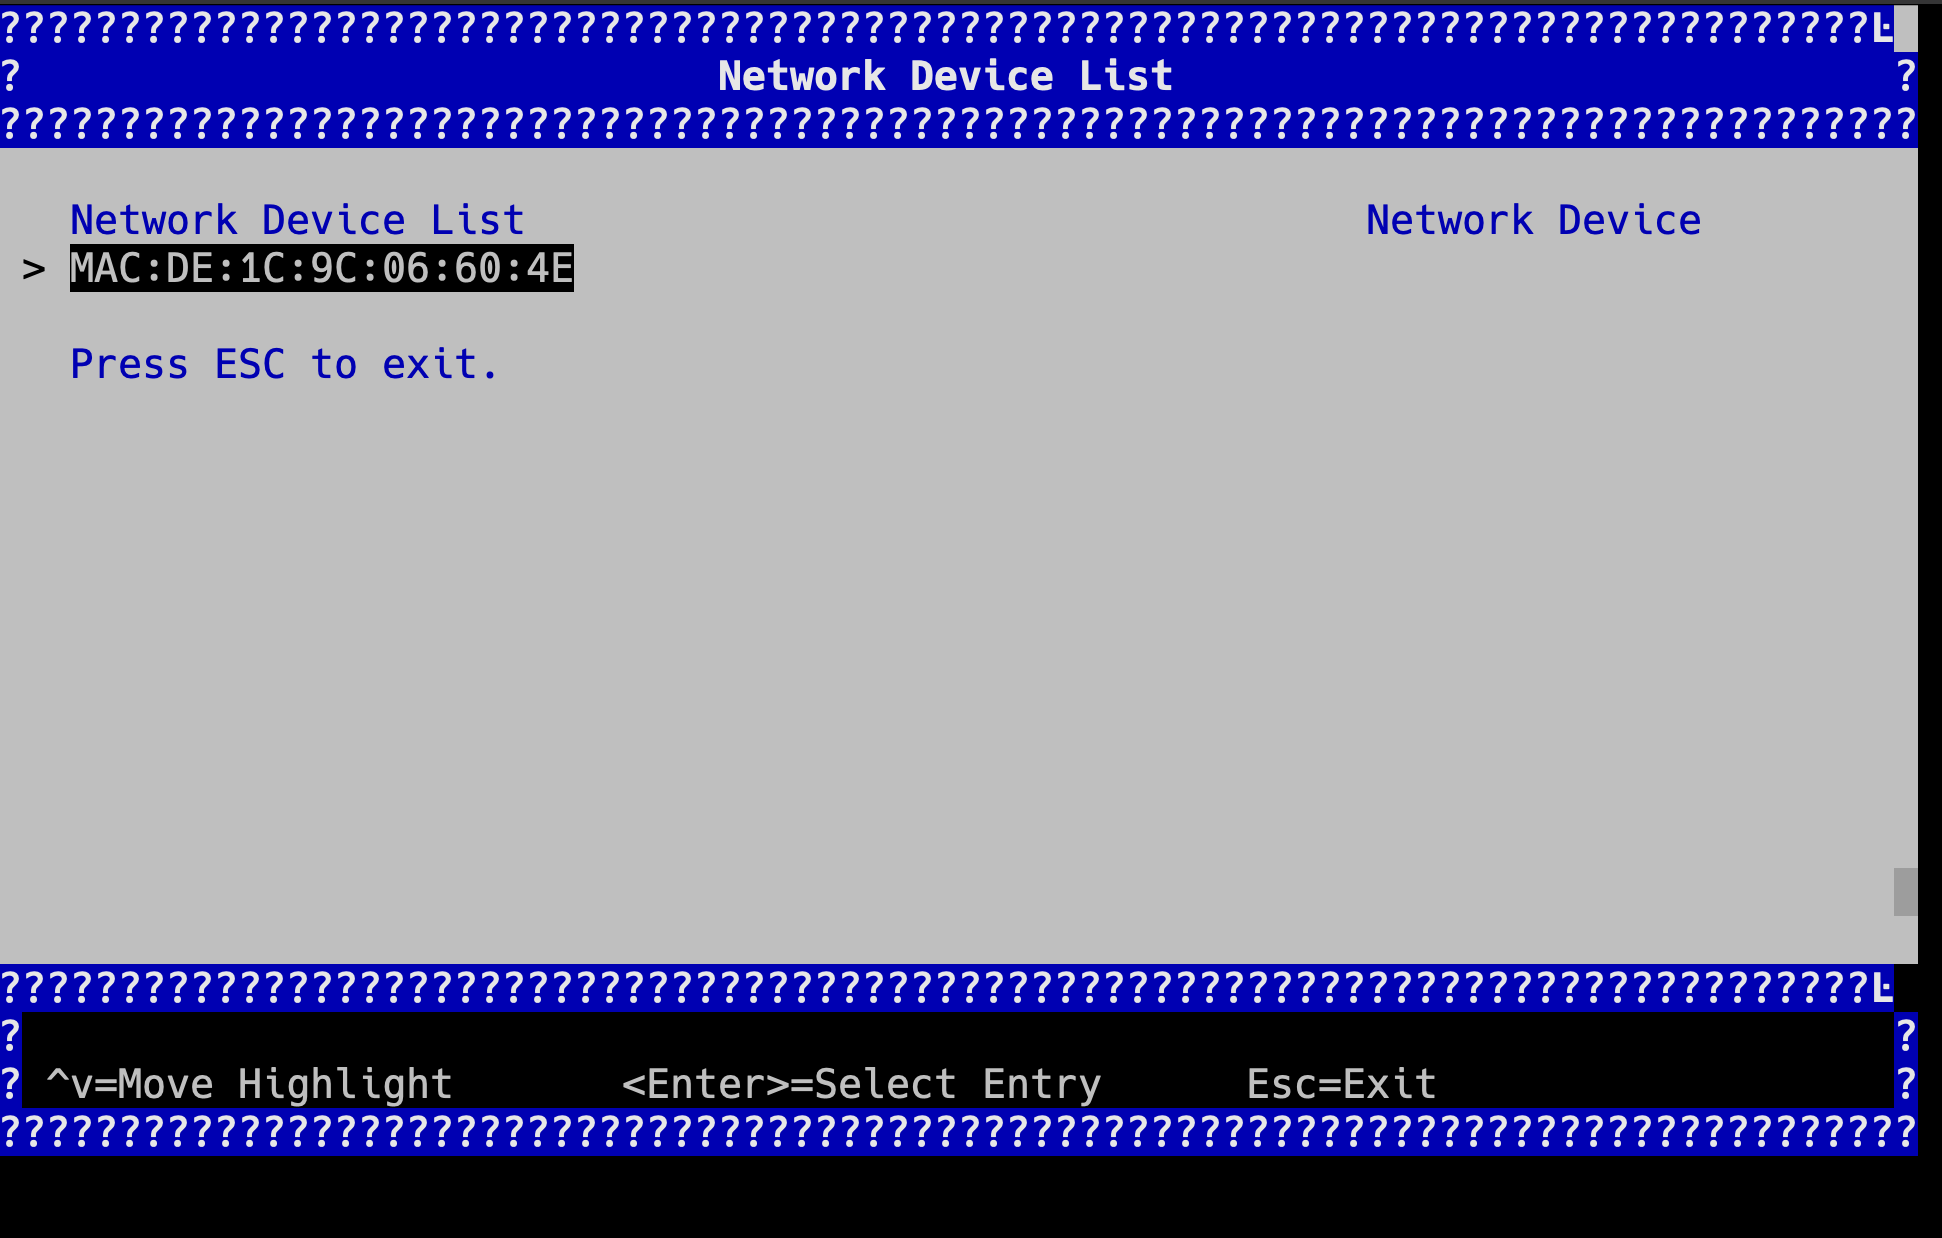
选择Device Manager-> Network Device List->HTTP Boot Configuration->Boot URI

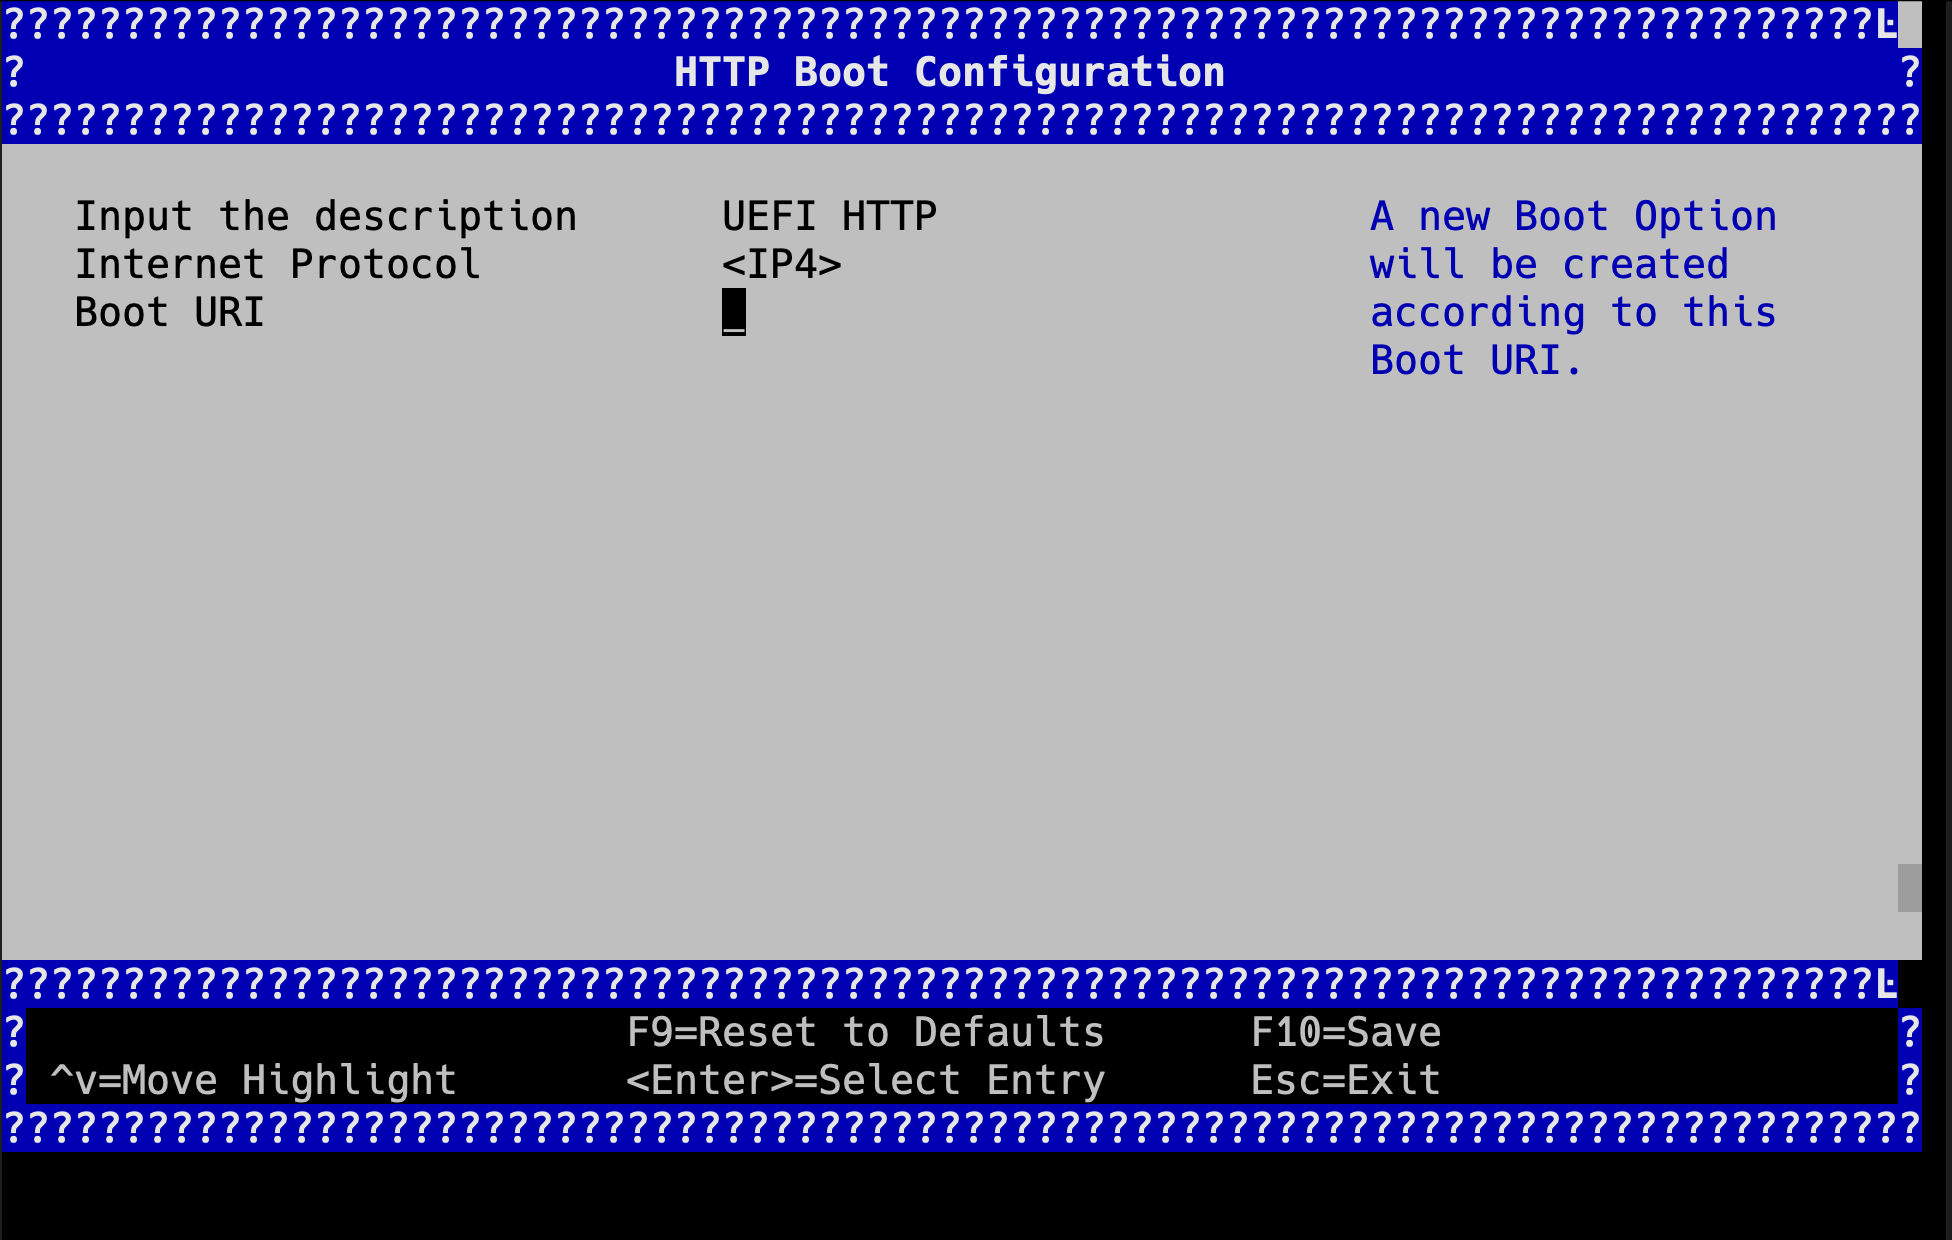
输入地址
http://boot.netboot.xyz/ipxe/netboot.xyz.efi
保存后返回主页
选择Boot Manager UEFI HTTP
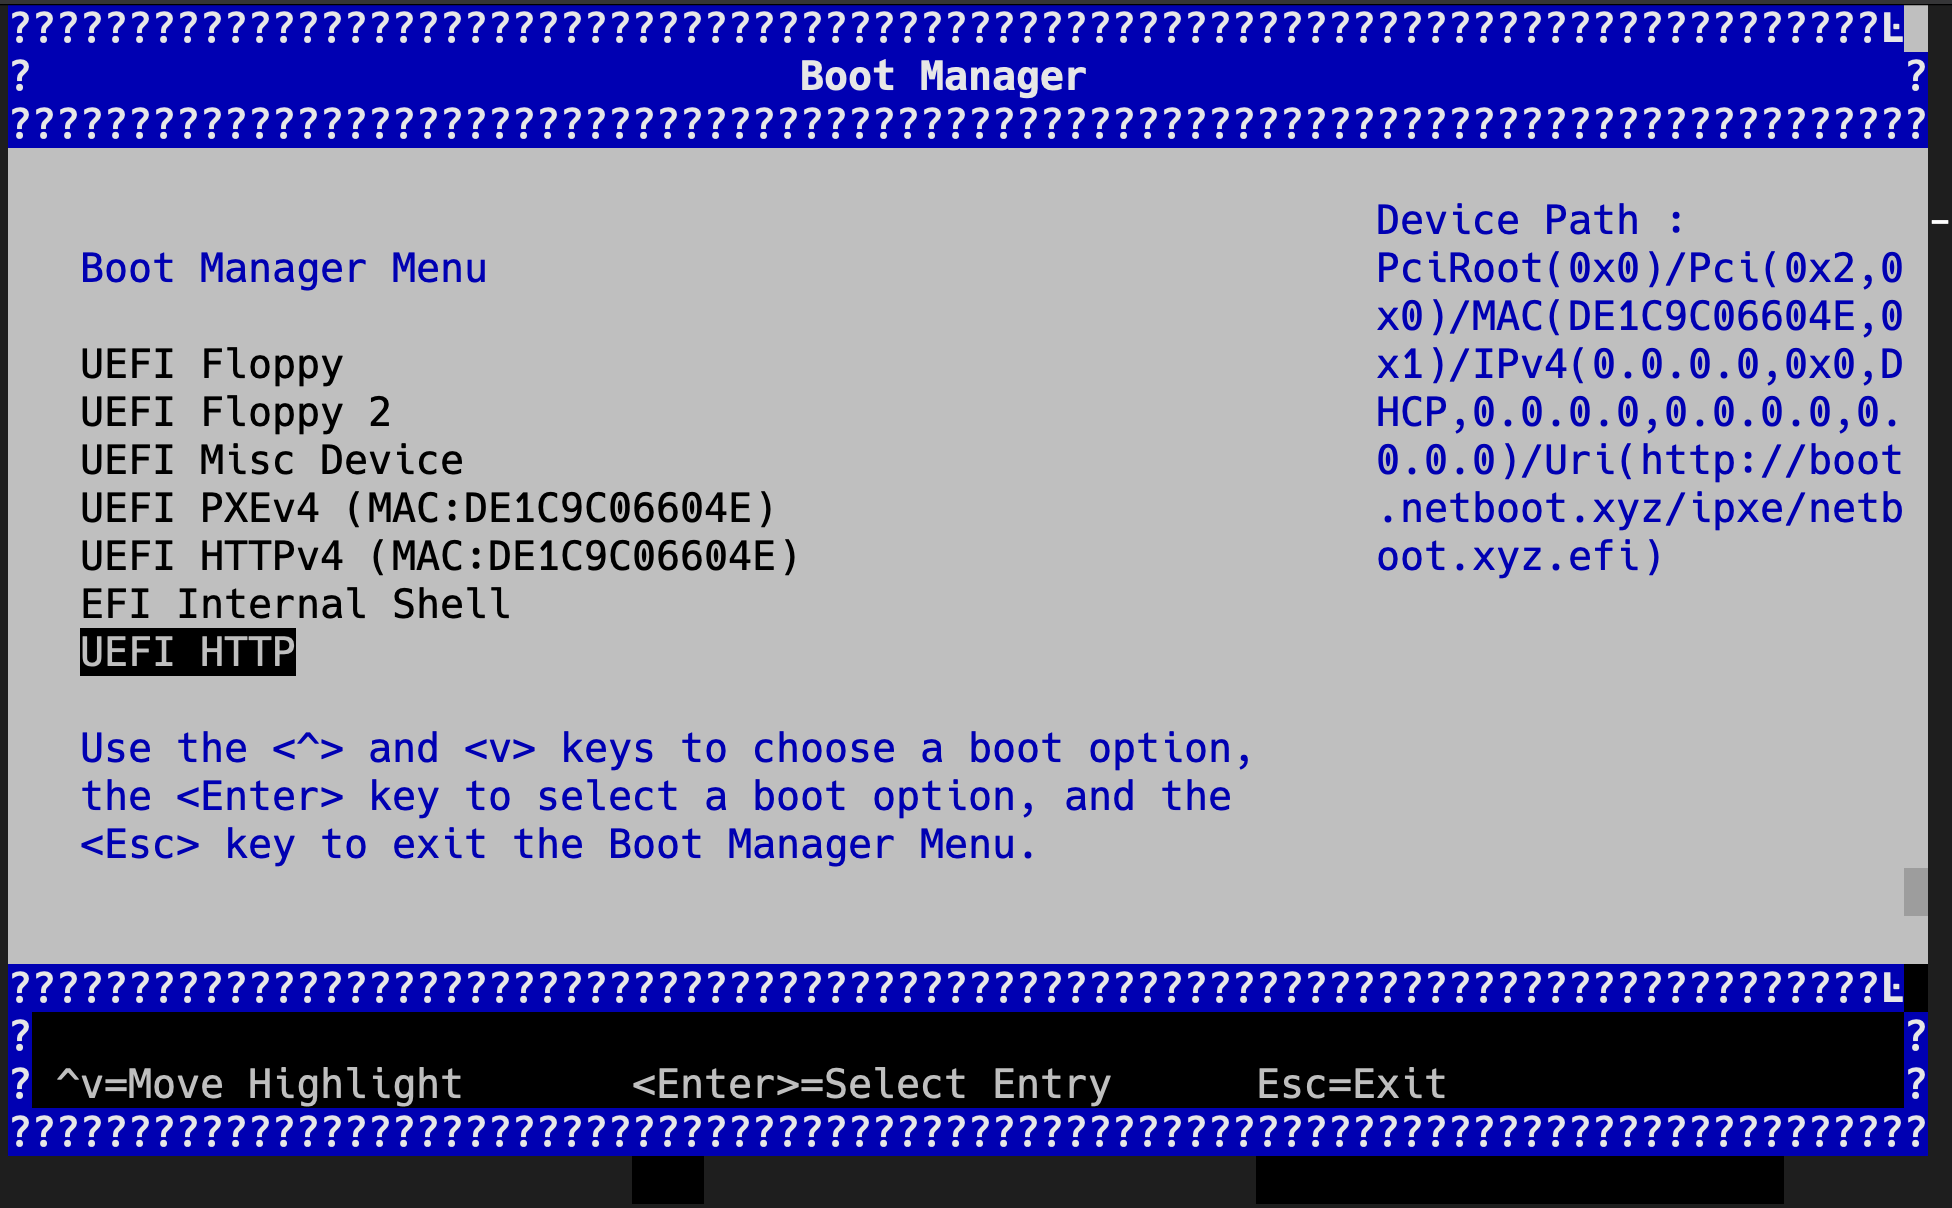

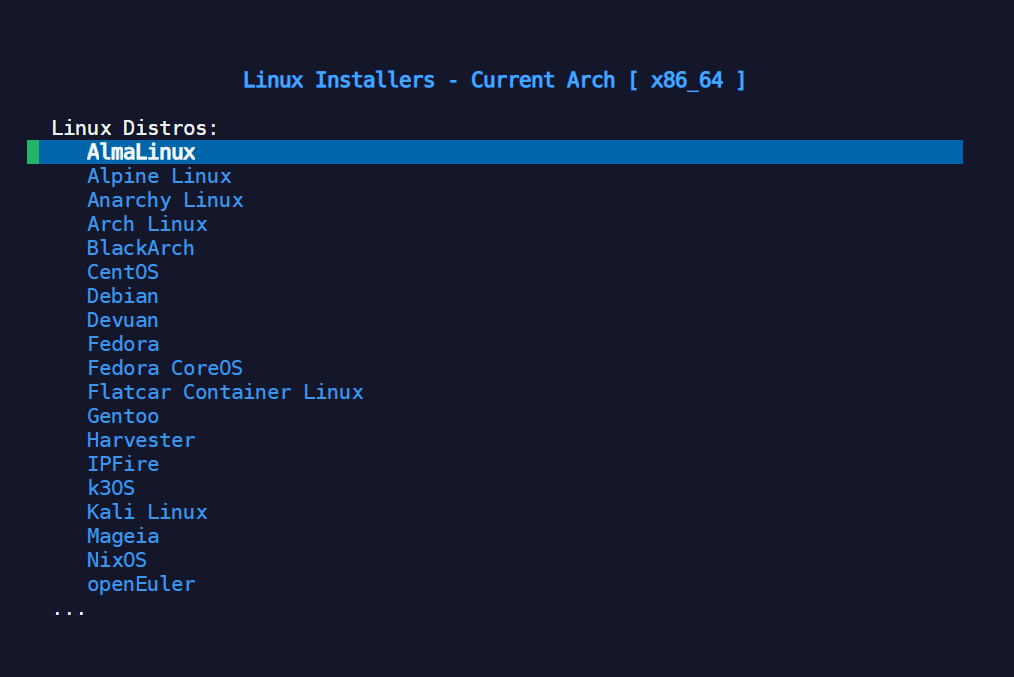
然后就会进入netboot.xyz界面了
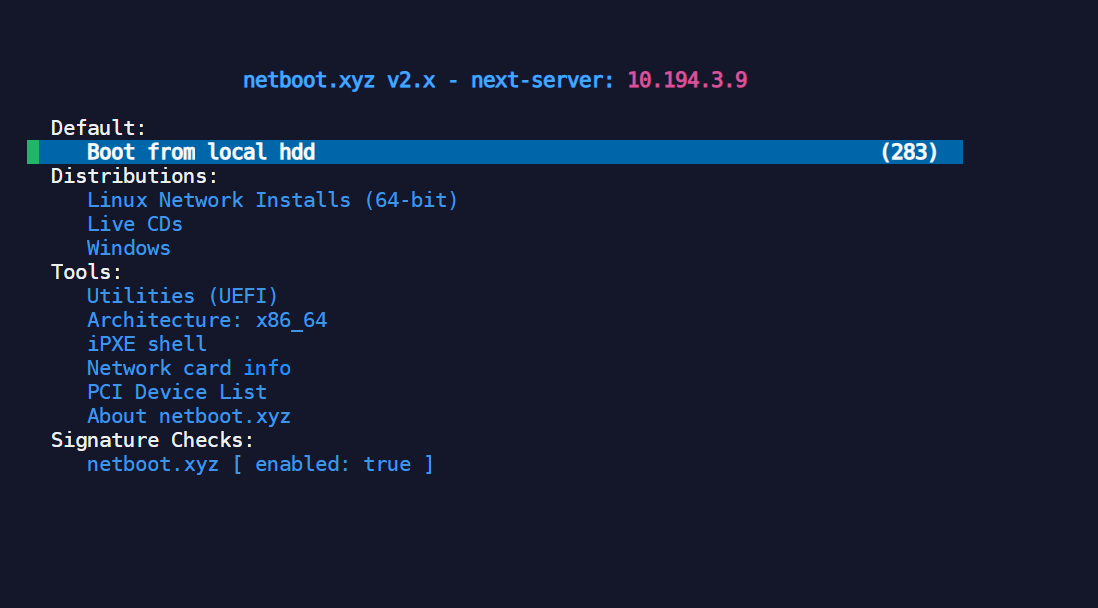
转到Utilities (UEFI)->Kernel cmdline params并输入
console=ttyS0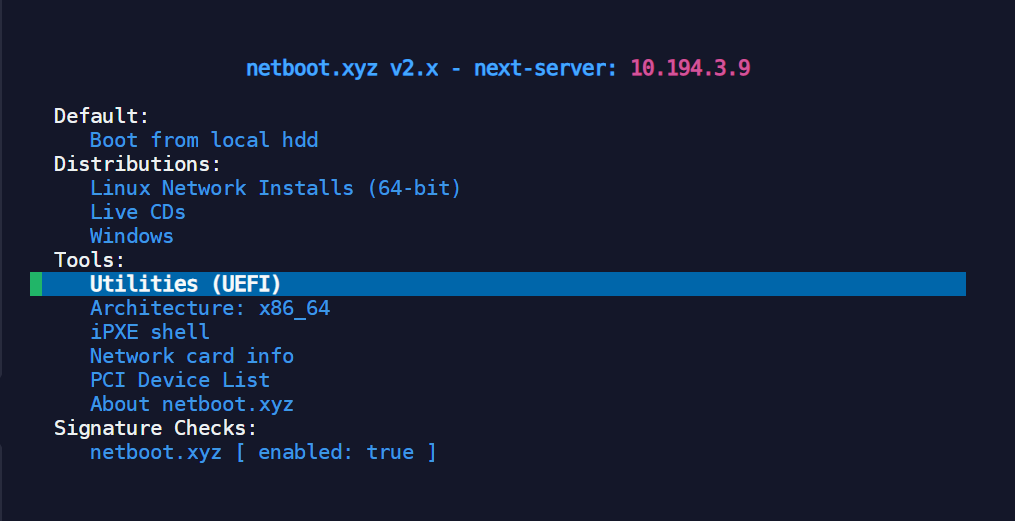
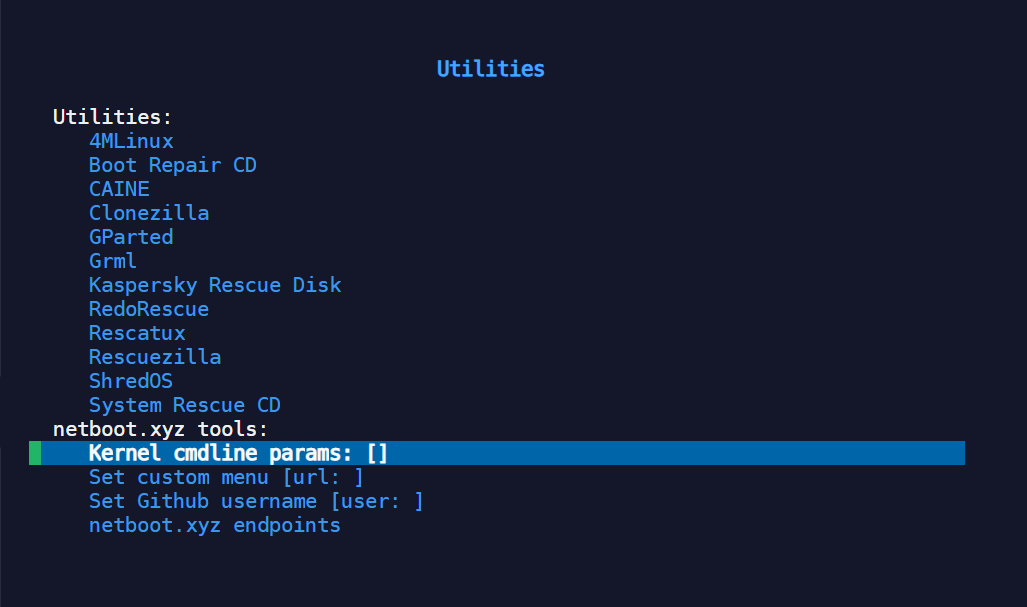

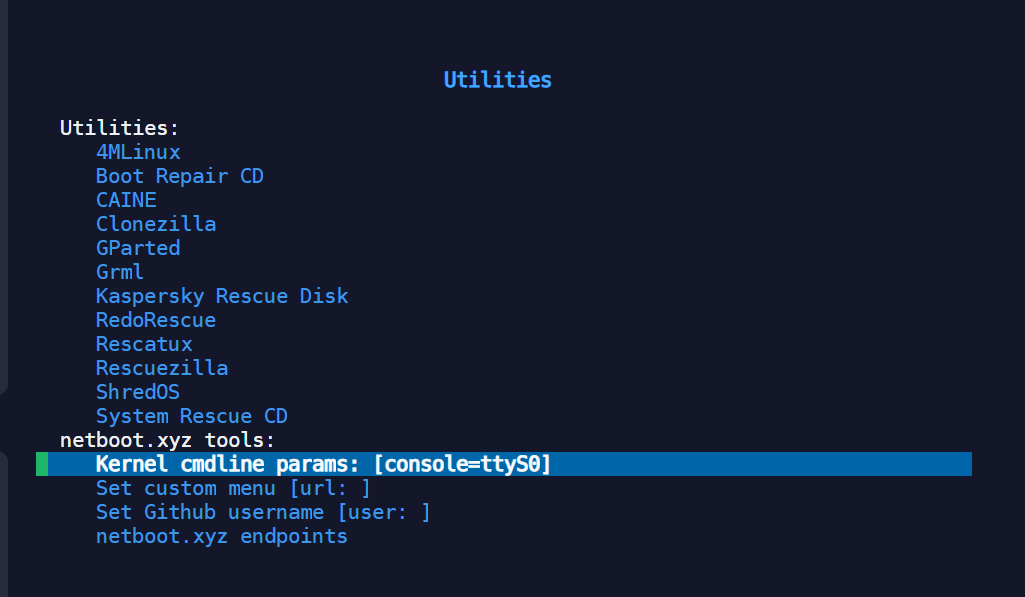
修改好之后按两下esc返回主界面
使用第二个选项进行安装系统

下面说一下 进不了系统的情况下如何重装
首先在后台把机子重启到救援模式
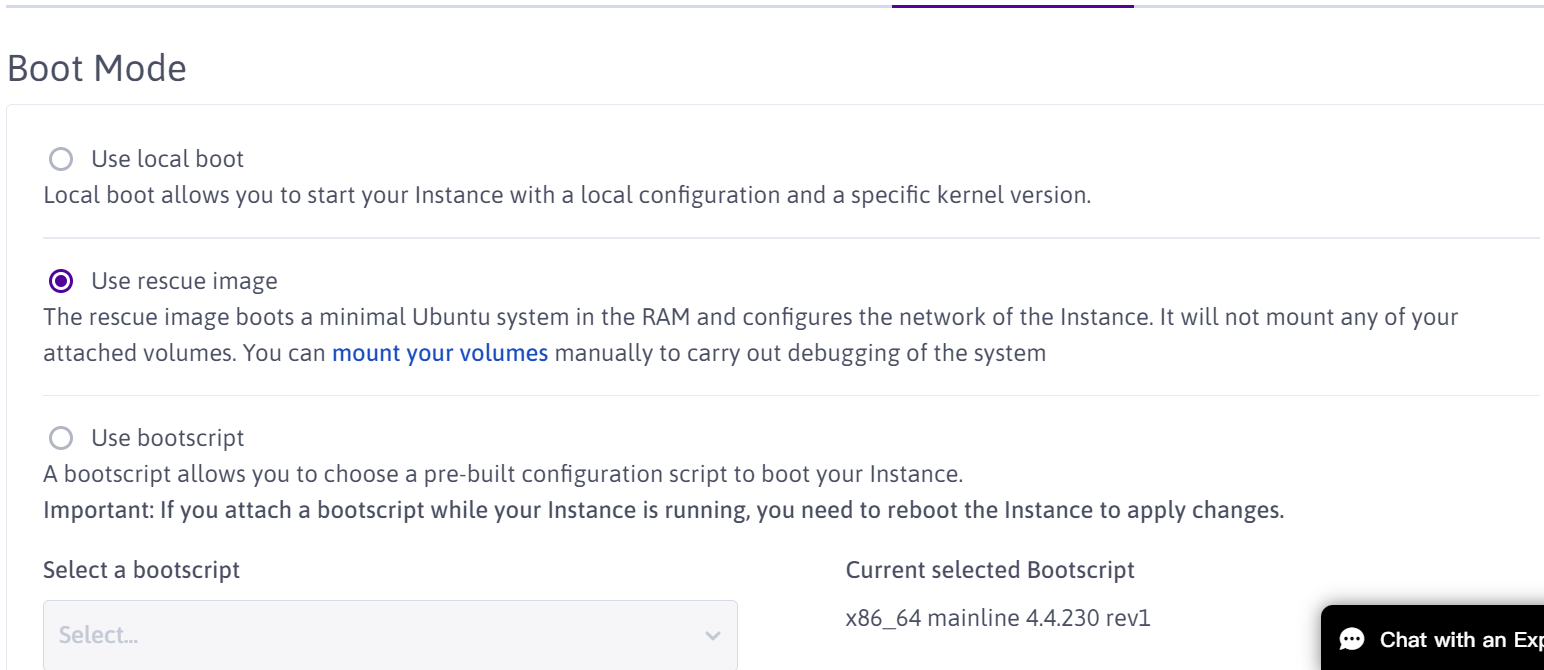
然后把硬盘设置成启动项
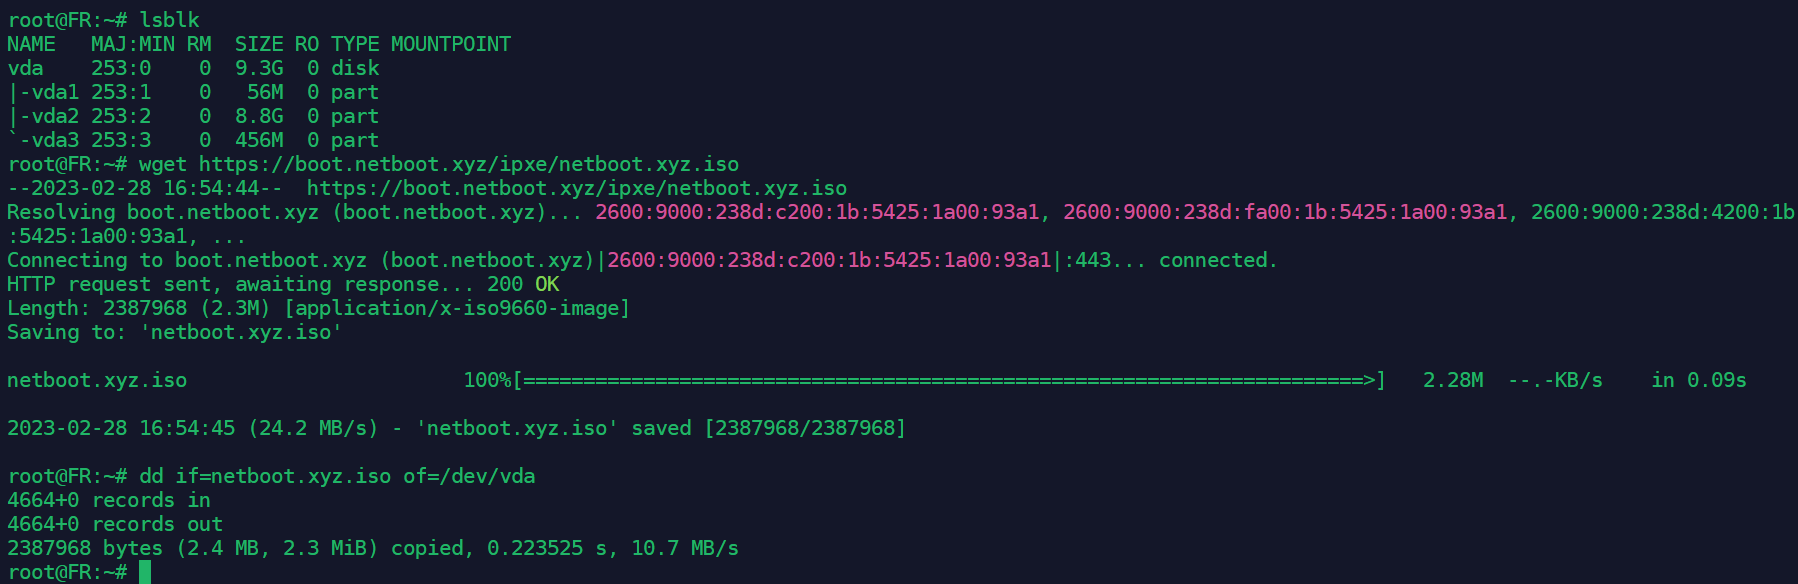
进入救援模式下,下载netboot的iso文件
wget https://boot.netboot.xyz/ipxe/netboot.xyz.iso直接把镜像d进硬盘,启动就能看到netboot界面了
[font color="紅"]最后说明,此方法需在有IPV4的环境下进行 安装好系统之后可以配置好网络 再把IPV4删除[/font]
题外
Sacleway-cli 用法
创建服务器
scw instance server create type=STARDUST1-S zone=fr-par-1 image=debian_bullseye root-volume=l:10G name=Denian ip=none ipv6=true project-id=UUID查看服务器,获取机器的UUID
scw instance server list开机
scw instance server start UUID自动开机脚本
来源
#!/usr/bin/env bash

MACHINE_UUID=""
BOT_API=""
CHAT_ID=""

STAR_MACHINE() {
    scw instance server start "${MACHINE_UUID}"
}

SEND_NOTIFY(){
    curl -X POST \
    -H 'Content-Type: application/json' \
    -d '{"chat_id": '${CHAT_ID}', "text": "Your Sacleway machine is opening now."}' \
    https://api.telegram.org/bot${BOT_API}/sendMessage
}

while true; do
    STATUS=$(scw instance server list | sed -n '2p' | awk '{print $4}')
    if [[ ${STATUS} == "starting" ]]; then
        echo "Your server status is ${STATUS}"
        echo "Starting...Wait for 60 seconds to check again..."
        sleep 60
    elif [[ ${STATUS} == "archived" ]]; then
        echo "Your server status is ${STATUS}"
        echo "Now we start your machine..."
        STAR_MACHINE
        sleep 60
    else
        SEND_NOTIFY
        break
    fi
done在lnmp安装目录/root/lnmp下找到lnmp.conf并编辑Nginx_Modules_Options
Nginx_Modules_Options='--with-http_realip_module'保存后执行./upgrade.sh nginx升级下Nginx。
找到网站配置文件,即/usr/local/nginx/conf/vhost/xx.com.conf并编辑。在任意一个location里加入以下参数:
set_real_ip_from 添加CDN IP段
    set_real_ip_from 0.0.0.0/0;
    real_ip_header X-Forwarded-For;
    real_ip_recursive on;
CloudFlare IP段
#Cloudflare
set_real_ip_from 173.245.48.0/20;
set_real_ip_from 103.21.244.0/22;
set_real_ip_from 103.22.200.0/22;
set_real_ip_from 103.31.4.0/22;
set_real_ip_from 141.101.64.0/18;
set_real_ip_from 108.162.192.0/18;
set_real_ip_from 190.93.240.0/20;
set_real_ip_from 188.114.96.0/20;
set_real_ip_from 197.234.240.0/22;
set_real_ip_from 198.41.128.0/17;
set_real_ip_from 162.158.0.0/15;
set_real_ip_from 104.16.0.0/13;
set_real_ip_from 104.24.0.0/14;
set_real_ip_from 172.64.0.0/13;
set_real_ip_from 131.0.72.0/22;
set_real_ip_from 2400:cb00::/32;
set_real_ip_from 2606:4700::/32;
set_real_ip_from 2803:f800::/32;
set_real_ip_from 2405:b500::/32;
set_real_ip_from 2405:8100::/32;
set_real_ip_from 2a06:98c0::/29;
set_real_ip_from 2c0f:f248::/32;

# use any of the following two
#real_ip_header CF-Connecting-IP;
real_ip_header X-Forwarded-For;
real_ip_recursive on;
编辑伪静态文件 直接插入 自动引用到所有vhost config上
/usr/local/nginx/conf/rewrite/none.conf
反向代理配置
  location / {
    proxy_pass http://127.0.0.1:3000;
    proxy_http_version  1.1;
    proxy_cache_bypass  $http_upgrade;

    proxy_set_header Upgrade           $http_upgrade;
    proxy_set_header Connection        "upgrade";
    proxy_set_header Host              $host;
    proxy_set_header X-Real-IP         $remote_addr;
    proxy_set_header X-Forwarded-For   $proxy_add_x_forwarded_for;
    proxy_set_header X-Forwarded-Proto $scheme;
    proxy_set_header X-Forwarded-Host  $host;
    proxy_set_header X-Forwarded-Port  $server_port;
  }
关闭防跨站
sed -i 's/^fastcgi_param PHP_ADMIN_VALUE/#fastcgi_param PHP_ADMIN_VALUE/g' /usr/local/nginx/conf/fastcgi.conf启用被禁用的函数
sed -i 's/,system//g' /usr/local/php/etc/php.ini
sed -i 's/,proc_open//g' /usr/local/php/etc/php.ini
sed -i 's/,proc_get_status//g' /usr/local/php/etc/php.ini| 命令 | 说明 |
|---|---|
| rclone config | 添加、删除、管理网盘等操作 |
| rclone config file | 显示配置文件的路径 |
| rclone config show | 显示配置文件信息 |
root@SunPma:~# rclone config
Current remotes:

Name                 Type
====                 ====
DB                 dropbox
GD                 drive

e) Edit existing remote
n) New remote
d) Delete remote
r) Rename remote
c) Copy remote
s) Set configuration password
q) Quit config
e/n/d/r/c/s/q>
语法
# 本地到网盘
rclone [功能选项] <本地路径> <配置名称:路径> [参数] [参数]

# 网盘到本地
rclone [功能选项] <配置名称:路径> <本地路径> [参数] [参数]

# 网盘到网盘
rclone [功能选项] <配置名称:路径> <配置名称:路径> [参数] [参数]

# [参数]为可选项
示例
# 复制到网盘,并显示实时传输进度,设置并行上传数为8

rclone copy -P /home/SunPma GD:/home/SunPma --transfers=8

# 如果需要服务端对服务端的传输可加以下参数(不消耗本地流量)

rclone copy 配置名称:网盘路径 配置名称:网盘路径 --drive-server-side-across-configs
功能
| 命令 | 说明 |
|---|---|
| rclone copy | 复制 |
| rclone move | 移动,如果要在移动后删除空源目录,加上 --delete-empty-src-dirs 参数 |
| rclone sync | 同步:将源目录同步到目标目录,只更改目标目录 |
| rclone size | 查看网盘文件占用大小 |
| rclone delete | 删除路径下的文件内容 |
| rclone purge | 删除路径及其所有文件内容 |
| rclone mkdir | 创建目录 |
| rclone rmdir | 删除目录 |
| rclone rmdirs | 删除指定环境下的空目录。如果加上 --leave-root 参数,则不会删除根目录 |
| rclone check | 检查源和目的地址数据是否匹配 |
| rclone ls | 列出指定路径下的所有的文件以及文件大小和路径 |
| rclone lsl | 比上面多一个显示上传时间 |
| rclone lsd | 列出指定路径下的目录 |
| rclone lsf | 列出指定路径下的目录和文件 |
参数
| 命令 | 说明 |
|---|---|
| -n = --dry-run | 测试运行,查看Rclon在实际运行中会进行哪些操作 |
| -P = --progress | 显示实时传输进度,500mS刷新一次,否则默认1分钟刷新一次 |
| --cache-chunk-size 5M | 块的大小,默认5M越大上传越快,占用内存越多,太大可能会导致进程中断 |
| --onedrive-chunk-size 100M | 提高OneDrive上传速度适用于G口宽带服务器(默认为320KB) |
| --drive-chunk-size 64M | 提高Google Drive上传速度适用于G口宽带服务器(默认为8M) |
| --cache-chunk-total-size SizeSuffix | 块可以在本地磁盘上占用的总大小,默认10G |
| --transfers=N | 并行文件数,默认为4 |
| --config string | 指定配置文件路径,string为配置文件路径 |
| --ignore-errors | 跳过错误 |
| --size-only | 根据文件大小校验,不校验hash |
| --drive-server-side-across-configs | 服务端对服务端传输 |
日志
有4个级别的日志记录:ERROR NOTICE INFO DEBUG
默认情况下Rclon将生成ERROR NOTICE日志
| 命令 | 说明 |
|---|---|
| -q | rclone将仅生成ERROR消息 |
| -v | rclone将生成ERROR NOTICE INFO 消息 |
| -vv | rclone 将生成ERROR NOTICE INFO DEBUG 消息 |
| --log-level LEVEL | 标志控制日志级别 |
输出日志到文件
使用--log-file=FILE选项rclone会将Error Info Debug消息以及标准错误重定向到FILE
这里的FILE是你指定的日志文件路径
例如
rclone sync -v Onedrive:/DRIVEX Gdrive:/DRIVEX > "~/DRIVEX.log" 2>&1过滤
| 命令 | 说明 |
|---|---|
| --exclude | 排除文件或目录 |
| --include | 包含文件或目录 |
| --filter | 文件过滤规则,相当于上面两个选项的其它使用方式。包含规则以+开头,排除规则以-开头 |
文件类型过滤
例如--exclude "*.bak" --filter "- *.bak"排除所有bak文件
例如--include "*.{png,jpg}" --filter "+ *.{png,jpg}"包含所有png和jpg文件,排除其他文件
例如--delete-excluded删除排除的文件。需配合过滤参数使用,否则无效
目录过滤
目录过滤需要在目录名称后面加上/否则会被当做文件进行匹配
以/开头只会匹配根目录(指定目录下),否则匹配所目录,这同样适用于文件--exclude ".git/"排除所有目录下的.git目录--exclude "/.git/"只排除根目录下的.git目录--exclude "{Video,Software}/"排除所有目录下的Video和Software目录--exclude "/{Video,Software}/"只排除根目录下的Video和Software目录--include "/{Video,Software}/**"仅包含根目录下的Video和Software目录的所有内容
大小过滤
默认大小单位为kBytes但可以使用k M或G后缀--min-size过滤小于指定大小的文件。比如--min-size 50表示不会传输小于50k的文件。--max-size过滤大于指定大小的文件。比如--max-size 1G表示不会传输大于1G的文件。
实际使用中发现大小过滤两个选项不能同时使用
过滤规则文件--filter-from <规则文件>从文件添加包含/排除规则
比如--filter-from filter-file.txt
过滤规则文件示例:
- secret*.jpg
+ *.jpg
+ *.png
+ file2.avi
- /dir/Trash/**
+ /dir/**
- *
环境变量
rclone中的每个选项都可以通过环境变量设置。环境变量的名称可以通过长选项名称进行转换,删除--前缀,更改-为_大写并添加前缀RCLONE_环境变量的优先级会低于命令行选项,即通过命令行追加相应的选项时会覆盖环境变量设定的值。
比如设置最小上传大小--min-size 50使用环境变量是RCLONE_MIN_SIZE=50当环境变量设置后,在命令行中使用--min-size 100那么此时环境变量的值就会被覆盖
常用环境变量
| 命令 | 说明 |
|---|---|
| RCLONE_CONFIG | 自定义配置文件路径 |
| RCLONE_CONFIG_PASS | 若 rclone 进行了加密设置,把此环境变量设置为密码,可自动解密配置文件 |
| RCLONE_RETRIES | 上传失败重试次数,默认 3 次 |
| RCLONE_RETRIES_SLEEP | 上传失败重试等待时间,默认禁用,单位s、m、h分别代表秒、分钟、小时 |
| CLONE_TRANSFERS | 并行上传文件数 |
| RCLONE_CACHE_CHUNK_SIZE | 块的大小,默认5M |
| RCLONE_CACHE_CHUNK_TOTAL_SIZE | 块可以在本地磁盘上占用的总大小,默认10G |
| RCLONE_IGNORE_ERRORS=true | 跳过错误 |
大部分内容拷贝自sunpma
]]>systemctl stop reflector.service连接网络
有线连接 若是连接到已经有网的路由器可以自动联网
如无法连接上网络可尝试使用dhcpcd命令
无线连接(WIFI)
iwctl列出无线网卡设备
device list 用wlan0网卡扫描网络
station wlan0 scan列出网络
station wlan0 get-networks连接网络网络SSID不支持中文
station wlan0 connect 无线网名字输入密码,连接成功后使用exit或者quit
同步网络时间
timedatectl set-ntp true修改软件源
把中国的服务器排在前列
nano /etc/pacman.d/mirrorlistServer = https://mirrors.ustc.edu.cn/archlinux/$repo/os/$arch
Server = https://mirrors.tuna.tsinghua.edu.cn/archlinux/$repo/os/$arch 刷新软件包
pacman -Sy安装ssh远程软件
pacman -S openssh启用sshd服务
systemctl start sshdpasswd设置当前root账户的密码
ip a查看ip地址
局域网内使用其他设备连接SSH操作更方便
磁盘分区
lsblk显示当前磁盘和分区情况
cfdisk /dev/nvme0n1系统格式可使用Btrfs或者EXT4
首先创建 Swap 分区。选中 Free space > 再选中操作 [New] > 然后按下回车 Enter 以新建 swap 分区(类似 Windows 的交换文件)
我们再只需要一个分区即可(因为使用 Btrfs 文件系统,所以根目录和用户主目录在一个分区上),所以类似的:选中 Free space > 再选中操作 [New] > 然后按下回车 Enter 以新建分区
分区类型默认即可,无需更改。接下来选中操作 [Write] 并回车 Enter > 输入 yes 并回车 Enter 确认分区操作
选中操作 [Quit] 并回车 Enter 以退出 cfdisk 分区工具
EFI引导分区可使用Windows的ESP分区。如没有可自行创建300MB的EFI引导分区
格式化 Swap 分区
mkswap /dev/nvme0n1px格式化 Btrfs 分区或者EXT4(二选一)
mkfs.btrfs -L Arch /dev/nvme0n1pxmkfs.ext4 /dev/nvme0n1px挂载分区
Btrfs文件格式
将 Btrfs 分区挂载到 /mnt 下
mount -t btrfs -o compress=zstd /dev/nvme0n1px /mnt创建 Btrfs 子卷
通过以下命令创建两个 Btrfs 子卷,之后将分别挂载到 / 根目录和 /home 用户主目录:
btrfs subvolume create /mnt/@
btrfs subvolume create /mnt/@home
复查子卷情况
btrfs subvolume list -p /mnt子卷创建好后,我们需要将 /mnt 卸载掉,以挂载子卷
umount /mnt挂载/目录
mount -t btrfs -o subvol=/@,compress=zstd /dev/nvme0n1px /mnt创建home目录
mkdir /mnt/home挂载/home目录
mount -t btrfs -o subvol=/@home,compress=zstd /dev/nvme0n1px /mnt/home创建 /boot/efi 目录
mkdir -p /mnt/boot/efi 挂载 /boot/efi 目录
mount /dev/nvme0n1px /mnt/boot/efiEXT4文件格式
mount /dev/nvme0n1px /mnt创建 /boot/efi 目录
mkdir -p /mnt/boot/efi 挂载 /boot/efi 目录(使用Windows系统ESP分区)
mount /dev/nvme0n1px /mnt/boot/efi挂载交换分区
swapon /dev/nvme0n1px安装系统
往/mnt目录里安装系统
其中最基础的四个包是base base-devel linux linux-firmware
pacstrap /mnt base base-devel linux linux-firmware dhcpcd iwd vim sudo bash-completion nano net-tools openssh man git wget zsh fish生成 fstab 文件
genfstab -U /mnt >> /mnt/etc/fstab复查一下 /mnt/etc/fstab 确保没有错误:
cat /mnt/etc/fstabchange root
使用以下命令把系统环境切换到新系统下:
arch-chroot /mnt设置主机名与时区
首先在 /etc/hostname 设置主机名:
nano /etc/hostname然后在 /etc/hosts 设置与其匹配的条目:
127.0.0.1       localhost
::1             localhost
127.0.1.1       myarch.localdomain    myarch
随后设置时区,在 /etc/localtime 下用 /usr 中合适的时区创建符号链接:
ln -sf /usr/share/zoneinfo/Asia/Shanghai /etc/localtime硬件时间设置
hwclock --systohc设置 Locale
Locale 决定了软件使用的语言、书写习惯和字符集。
编辑 /etc/locale.gen,去掉 en_US.UTF-8 UTF-8 以及 zh_CN.UTF-8 UTF-8 行前的注释符号(#):
nano /etc/locale.gen然后使用如下命令生成 locale
locale-gen向 /etc/locale.conf 输入内容:
echo 'LANG=en_US.UTF-8' > /etc/locale.conf为 root 用户设置密码
passwd root开启 32 位支持库与 Arch Linux 中文社区仓库(archlinuxcn)
nano /etc/pacman.confctrl+w 搜索Color注意大小写 删除#号
系统报错会彩色显示 方便用户排查
[multilib]这两行前面的#号删除
再手动添加[archlinuxcn]源
我这里以中科大和网易开源镜像站为例
其他地址 如清华 阿里云 或者你所在的高校有archlinuxcn源 可以自行添加
[archlinuxcn]
Server = https://mirrors.ustc.edu.cn/archlinuxcn/$arch
Server = https://mirrors.tuna.tsinghua.edu.cn/archlinuxcn/$arch
官方源
[archlinuxcn]
Server = https://repo.archlinuxcn.org/$arch
添加非 root 用户
新建用户名arch 可自行更改用户名
useradd -m -G wheel -s /bin/bash arch设置arch用户名的密码
passwd arch编辑arch用户的权限
EDITOR=nano visudoctrl+w搜索%wheel
找到# %wheel ALL=(ALL:ALL)ALL
删除前面的#号
安装CPU微码和引导软件
通过以下命令安装对应芯片制造商的微码:
intel-ucode # Intel
amd-ucode # AMD
os-prober #查找已安装的操作系统
pacman -S intel-ucode grub efibootmgr os-prober安装 GRUB 到 EFI 分区:
grub-install --target=x86_64-efi --efi-directory=/boot/efi --bootloader-id=Arch接下来 编辑 /etc/default/grub 文件:
nano /etc/default/grub进行如下修改:
- 去掉
GRUB_CMDLINE_LINUX_DEFAULT一行中最后的quiet参数 - 把
loglevel的数值从3改成5。这样是为了后续如果出现系统错误,方便排错 - 加入
nowatchdog参数,这可以显著提高开关机速度 - 为了引导 win10,则还需要添加新的一行
GRUB_DISABLE_OS_PROBER=false
# GRUB boot loader configuration

GRUB_DEFAULT=0
GRUB_TIMEOUT=5
GRUB_DISTRIBUTOR="Arch"
GRUB_CMDLINE_LINUX_DEFAULT="loglevel=5 nowatchdog"
GRUB_CMDLINE_LINUX=""
GRUB_DISABLE_OS_PROBER=false
...
最后生成 GRUB 所需的配置文件:
grub-mkconfig -o /boot/grub/grub.cfg如遇到报错或无法引导Windows分区可使用下面的命令
sudo LANG=C grub-mkconfig -o /boot/grub/grub.cfg安装KDE桌面 字体 浏览器等软件包
pacman -S plasma-meta konsole dolphin # plasma-meta 元软件包、konsole 终端模拟器和 dolphin 文件管理器pacman -S ntfs-3g **可以读取ntfs格式磁盘 **
pacman -S os-prober **查找已安装的操作系统 **中文字体 这里如果不安装 之后设置语言的时候都是框框不好辨认
pacman -S adobe-source-han-serif-cn-fonts adobe-source-han-sans-cn-fonts wqy-zenhei wqy-microhei noto-fonts-cjk noto-fonts-emoji noto-fonts-extra ttf-dejavu 安装火狐浏览器等软件
pacman -S firefox ark gwenview packagekit-qt5 packagekit appstream-qt appstream man neofetch net-tools networkmanager openssh git wget pamac开机启动 登陆管理器 网络管理 SSH
systemctl enable NetworkManager sddm sshd立即启动登陆管理器
systemctl start sddm安装完成
卸载本机的/mnt目录
umount -R /mnt重启
reboot输入密码登录进桌面环境
安装AUR助手 前提是开启AUR中国源
sudo pacman -S archlinuxcn-keyring && sudo pacman -S yay启动蓝牙(若有)
sudo pacman -S bluez bluez-utils sudo systemctl enable --now bluetooth安装音频驱动
sudo pacman -S alsa-utils pulseaudio pulseaudio-alsa pulseaudio-bluetooth安装显卡驱动
Intel 核芯显卡
sudo pacman -S mesa lib32-mesa vulkan-intel lib32-vulkan-intel不建议安装 xf86-video-intel,而应使用 Xorg 的 modesetting 驱动(也就是什么都不用装的意思)
注意,只有 Intel HD 4000 及以上的核显才支持 vulkan。
不建议安装 xf86-video-intel,而应使用 Xorg 的 modesetting 驱动(也就是什么都不用装的意思)
注意,只有 Intel HD 4000 及以上的核显才支持 vulkan。
题外如果太久没更新 密钥环失效
sudo pacman -Sy archlinux-keyringpacman-key --refresh-keys题外
更换LTS内核
pacman -S linux-lts linux-lts-headers
pacman -Rsdd linux
grub-mkconfig -o /boot/grub/grub.cfg
开启BBR
echo "tcp_bbr" > /etc/modules-load.d/modules.conf
echo "net.core.default_qdisc=fq" > /etc/sysctl.d/bbr.conf
echo "net.ipv4.tcp_congestion_control=bbr" >> /etc/sysctl.d/bbr.conf
sysctl --system
校验
sysctl net.ipv4.tcp_congestion_control安装cron定时任务
pacman -S cronie默认 editor 为 vi, 在 /etc/environment 下配置环境变量
EDITOR=nano清理系统日志文件 保留的最新日志文件大小为100M
journalctl --vacuum-size=100M设置系统日志只保留100M
nano /etc/systemd/journald.conf修改#SystemMaxUse=为SystemMaxUse=100M
重新加载 systemd-journald 服务以应用更改
systemctl restart systemd-journaldWSL配置代理(非必选)
配置http/https
export all_proxy="http://${hostip}:{port}"配置socks5
export all_proxy="socks5://${hostip}:{port}"使用 curl 即可验证是否代理成功,如下有返回值说明成功
➜  ~curl google.com
<HTML><HEAD><meta http-equiv="content-type" content="text/html;charset=utf-8"><TITLE>301 Moved</TITLE></HEAD><BODY><H1>301 Moved</H1>The document has moved<A HREF="http://www.google.com/">here</A>.</BODY></HTML>
可以将上面命令选择你需要的添加到 .bashrc ,这样会让代理一直开启。
安装编译时所需的依赖
sudo apt updatesudo apt install bc bison build-essential ccache curl flex g++-multilib gcc-multilib git gnupg gperf imagemagick lib32ncurses5-dev lib32readline-dev lib32z1-dev liblz4-tool libncurses5 libncurses5-dev libsdl1.2-dev libssl-dev libxml2 libxml2-utils lzop pngcrush rsync schedtool squashfs-tools xsltproc zip zlib1g-dev git安装repo
mkdir -p ~/bincurl https://mirrors.tuna.tsinghua.edu.cn/git/git-repo> ~/bin/reposudo cp ~/bin/repo /bin/reposudo chmod a+x /bin/repoexport PATH=/bin:$PATHexport REPO_URL='https://mirrors.tuna.tsinghua.edu.cn/git/git-repo'拉取源码
mkdir TWRP
cd TWRP
要使用 OMNIROM 树初始化本地存储库以构建 TWRP,请使用如下命令
repo init -u https://github.com/minimal-manifest-twrp/platform_manifest_twrp_omni.git -b twrp-9.0只拉取一层提交,可以减少拉下来的源码大小
repo init --depth=1 -u https://github.com/minimal-manifest-twrp/platform_manifest_twrp_omni.git -b twrp-9.0最后会提示你输入用户名和邮箱,输入之后回车,选y即可
当出现repo has been initialized in xxx就成功了
然后同步源码
repo sync当出现repo sync has finished successfully.表示源码同步完成
准备编译
准备好设备的Device Tree
可在Github或者XDA上寻找,一般使用手机代号寻找
but,手机比较冷门的可能找不到,这个时候就需要我们使用脚本生成Device Tree用于编译TWRP
提取设备的 recovery/boot.img
手机是A-Only或Sar的提取recovery.img,A/B分区的提取boot.img
此工具Python 3.8或更高版本
sudo apt install cpiopip3 install twrpdtgenpython3 -m twrpdtgen 镜像文件绝对路径进入output文件夹就可用看到一个我们手机厂商名的文件夹
然后我们把这个文件夹复制到源码目录下的device文件夹
进入厂商文件夹之后还有一个文件夹,这是你的设备名,记住你的设备名,等下要用到。
在构建之前,请确保您已将系统的 python 实现设置为 python2。该项目不会使用 python3 构建。
设置方法
sudo apt install python2查找python2的安装路径
whereis python2创建软链接符号
sudo ln -s /usr/bin/python2 /usr/bin/python查看python版本
python -V开始编译
回到源码根目录
为具有恢复分区的设备构建
export ALLOW_MISSING_DEPENDENCIES=true; . build/envsetup.sh; lunch omni_<device>-eng; mka recoveryimage为没有恢复分区的设备构建
export ALLOW_MISSING_DEPENDENCIES=true; . build/envsetup.sh; lunch omni_<device>-eng; mka bootimage此时已经开始编译了,过程比较漫长,请耐心等待。(取决电脑配置)
build completed successfully
当看到出现这串文字,表示已经编译成功。
然后我们进入out/target/product/设备名这个文件夹,就可以看到编译好的TWRP了。
Manjaro换源
sudo pacman-mirrors -c China添加 archlinuxcn 源,获得更多的包:
sudo nano /etc/pacman.conf[archlinuxcn]
SigLevel = Optional TrustAll
Server = https://mirrors.ustc.edu.cn/archlinuxcn/$arch
Server = https://mirrors.tuna.tsinghua.edu.cn/archlinuxcn/$arch## xTom (Hong Kong server) (Hong Kong) (ipv4, ipv6, http, https)
## Added: 2017-09-18
## Blocking users in mainland China
[archlinuxcn]
Server = https://mirrors.xtom.hk/archlinuxcn/$arch更新系统、软件
sudo pacman -Syyu下载 yay AUR 助手
sudo pacman -S yayyay安装报错
sudo pacman -Sy && sudo pacman -S archlinuxcn-keyringsudo rm -rf /etc/pacman.d/gnupg
sudo pacman-key --init
sudo pacman-key --populate安装 base-devel,yay 命令构建包时会使用到
sudo pacman -S base-devel输入法配置
yay -S fcitx5-im fcitx5-chinese-addons fcitx5-material-color fcitx5-pinyin-zhwikifcitx5-im fcitx5 输入法框架包
fcitx5-chinese-addons 中文输入法
fcitx5-material-color 皮肤美化包
fcitx5-pinyin-zhwiki 词库安装完成后编辑将下面 3 行代码加入到 /etc/environment 文件中,这样可以预防出现某些程序不能输入中文的情况发生
GTK_IM_MODULE=fcitx
QT_IM_MODULE=fcitx
XMODIFIERS=@im=fcitx
ohmyzsh
wget https://github.com/robbyrussell/oh-my-zsh/raw/master/tools/install.sh -O - | sh更改默认 shell 为 zsh:
chsh -s /usr/bin/zsh
zsh
下载插件:
自动补全
git clone https://github.com/zsh-users/zsh-autosuggestions $ZSH_CUSTOM/plugins/zsh-autosuggestions

语法高亮
git clone https://github.com/zsh-users/zsh-syntax-highlighting.git $ZSH_CUSTOM/plugins/zsh-syntax-highlighting

zsh-vi-mod
git clone https://github.com/jeffreytse/zsh-vi-mode $ZSH_CUSTOM/plugins/zsh-vi-mode
安装 autojump,终端目录跳转神器:
git clone https://github.com/wting/autojump
cd autojump
./install.py
cd ..
rm -rf autojump
打开 ~/.zshrc 找到 plugins 将它改成下面这样:
plugins=(
    git
    zsh-syntax-highlighting
    zsh-autosuggestions
    zsh-vi-mode
    colored-man-pages
)在~/.zshrc尾部添加
[[ -s ~/.autojump/etc/profile.d/autojump.sh ]] && . ~/.autojump/etc/profile.d/autojump.sh常用软件安装
Chrome
yay -S google-chrome网易云音乐
sudo pacman -S netease-cloud-musicWPS
yay -S ttf-wps-fonts wps-office-mui-zh-cn wps-office-mime-cn wps-office-cnyay -S wps-office-fonts ttf-ms-fonts百度网盘
yay -S baidunetdisk迅雷
yay -S xunlei-bin 微信
yay -S deepin-wine-wechat微信运行时会显示:
程序 WeChatApp.exe 遇到严重问题需要关闭。我们对此造成的不便表示抱歉。
其实这个 BUG 不影响使用,但是看着心烦,解决办法是先运行如下命令:
/opt/apps/com.qq.weixin.deepin/files/run.sh winecfg然后选择函数库选项卡,新增函数库顶替的输入框中中输入 wechatapp.exe ,点击右侧添加,选择新建好的 wechatapp.exe,点击编辑,选择停用即可。
yay -S deepin-wine-qqTeamviewer
yay -S teamviewer火焰截图
sudo pacman -S flameshotTypora
Typora 最新版已经收费,可以在官网下载以前的版本并手动安装,下面是最后一个免费版本:
下载完成后手动安装:
sudo tar -xvf ~/Downloads/Typora-linux-x64-1.0.3.tar.gz -C /usr/local
sudo mv /usr/local/bin/Typora-linux-x64 /usr/local/typora
添加可视化启动程序,在 ~/.local/share/applications 下新建以下文件,Typora 内部自己有 PNG 图片,所以不需要额外下载,直接复制粘贴以下内容即可:
vim ~/.local/share/applications/typora.desktop

[Desktop Entry]
Type=Application
Name=Typora
Exec=/usr/local/typora/Typora
Icon=/usr/local/typora/resources/assets/icon/[email protected]
Terminal=false
Categories=program;InstantMessaging
Picgo
yay -S picgo-appimage如果可以直接安装就直接使用。我这里自动安装出现了问题,所以又需要手动安装了。
先到 picgo 的 github 中下载 AppImage 后缀的包,然后双击安装即可。
转换 deb 包
安装 debtab:
sudo pacman -S debtap更新 debtab:
sudo debtap -u下载好待转换的 deb 包,将其转换,以下步骤一路回车即可:
sudo debtap ~/Downloads/包名.deb安装转换后的包:
sudo pacman -U ~/Downloads/包名.pkg.tar.zst配置Git
配置 Git 用户名、密码、代理 :
git config --global user.name <用户名>
git config --global user.email <邮箱地址>
git config --global http.proxy socks5://127.0.0.1:7890
git config --global https.proxy socks5://127.0.0.1:7890
添加 SSH:
ssh-keygen # 疯狂回车拷贝公钥 ~/.ssh/id_rsa.pub 中的内容,到 github 中添加 ssh keys 即可。
VMware-WorkStation
VMware-WorkStation包在AUR上可用,可以通过运行命令来安装。
yay -S vmware-workstation安装系统对应的linux-headers
sudo pacman -S linux-headers载入vmmon模块
sudo modprobe -a vmw_vmci vmmon自启动网络服务和USB
sudo systemctl enable vmware-networks.service vmware-usbarbitrator.servicesudo systemctl start vmware-networks.service vmware-usbarbitrator.service安装osc-url
下载 ocs-url:点我跳转
下载完成后手动安装:
sudo pacman -U ~/Downloads/ocs-url-3.1.0-1-x86_64.pkg.tar.xzfail2ban可以监视你的系统日志,然后匹配日志的错误信息执行相应的屏蔽动作。网上大部分教程都是关于fail2ban+iptables组合,考虑到CentOS 7已经自带Firewalld,所以这里我们也可以利用fail2ban+Firewalld来防CC攻击和SSH爆破。
准备工作
1、检查Firewalld是否启用
如果您已经安装iptables建议先关闭
service iptables stop查看Firewalld状态
firewall-cmd --state启动firewalld
systemctl start firewalld设置开机启动
systemctl enable firewalld.service启用Firewalld后会禁止所有端口连接,因此请务必放行常用的端口,以免被阻挡在外,以下是放行SSH端口(22)示例,供参考:
放行22端口
firewall-cmd --zone=public --add-port=22/tcp --permanent重载配置
firewall-cmd --reload查看开放的端口
firewall-cmd --zone=public --list-ports2、安装fail2ban
fail2ban可以监控系统日志,并且根据一定规则匹配异常IP后使用Firewalld将其屏蔽,尤其是针对一些爆破/扫描等非常有效。
CentOS内置源并未包含fail2ban,需要先安装epel源
yum -y install epel-release安装fial2ban
yum -y install fail2ban安装成功后fail2ban配置文件位于/etc/fail2ban,其中jail.conf为主配置文件,相关的匹配规则位于filter.d目录,其它目录/文件一般很少用到,如果需要详细了解可自行搜索。
3、配置规则
新建jail.local来覆盖fail2ban的一些默认规则:
新建配置
vi /etc/fail2ban/jail.local默认配置
[DEFAULT]
ignoreip = 127.0.0.1/8
bantime  = 86400
findtime = 600
maxretry = 5
#这里banaction必须用firewallcmd-ipset,这是fiewalll支持的关键,如果是用Iptables请不要这样填写
banaction = firewallcmd-ipset
action = %(action_mwl)s
参数说明:
ignoreip:IP白名单,白名单中的IP不会屏蔽,可填写多个以(,)分隔
bantime:屏蔽时间,单位为秒(s)
findtime:时间范围
maxretry:最大次数
banaction:屏蔽IP所使用的方法,上面使用firewalld屏蔽端口
防止SSH爆破
继续修改jail.local这个配置文件,在后面追加如下内容:
[sshd]
enabled = true
filter  = sshd
port    = 22
action = %(action_mwl)s
logpath = /var/log/secure
参数说明:
[sshd]:名称,可以随便填写
filter:规则名称,必须填写位于filter.d目录里面的规则,sshd是fail2ban内置规则
port:对应的端口
action:采取的行动
logpath:需要监视的日志路径到这一步,我们jail.local的规则看起来可能像下面这样子:
[DEFAULT]
ignoreip = 127.0.0.1/8
bantime  = 86400
findtime = 600
maxretry = 5
banaction = firewallcmd-ipset
action = %(action_mwl)s

[sshd]
enabled = true
filter  = sshd
port    = 22
action = %(action_mwl)s
logpath = /var/log/secure上面的配置意思是如果同一个IP,在10分钟内,如果连续超过5次错误,则使用Firewalld将他IP ban了。输入systemctl start fail2ban启动fail2ban来试试效果。
使用另一台服务器不断尝试连接SSH,并且不断的将密码输入错误,你会发现连续超过5次后直接连不上,说明IP被ban了,可以输入:fail2ban-client status sshd查看被ban的IP
防止CC攻击
这里仅以Nginx为例,使用fail2ban来监视nginx日志,匹配短时间内频繁请求的IP,并使用firewalld将其IP屏蔽,达到CC防护的作用。
需要先新建一个nginx日志匹配规则
vi /etc/fail2ban/filter.d/nginx-cc.conf填写以下内容
[Definition]
failregex = <HOST> -.*- .*HTTP/1.* .* .*$
ignoreregex =继续修改jail.local追加如下内容:
[nginx-cc]
enabled = true
port = http,https
filter = nginx-cc
action = %(action_mwl)s
maxretry = 20
findtime = 60
bantime = 3600
logpath = /usr/local/nginx/logs/access.log上面的配置意思是如果在60s内,同一IP达到20次请求,则将其IP ban 1小时,上面只是为了测试,请根据自己的实际情况修改。logpath为nginx日志路径。
常用命令
启动
systemctl start fail2ban停止
systemctl stop fail2ban重启
systemctl restart fail2ban开机启动
systemctl enable fail2ban关闭开机启动
systemctl disable fail2ban查看被ban IP,其中sshd为名称,比如上面的[nginx-cc]
fail2ban-client status sshd删除被ban IP
fail2ban-client set sshd delignoreip 192.168.111.111或
fail2ban-client set sshd unbanip 192.168.111.111查看日志
tail /var/log/fail2ban.log